All About MVP Cues
Below is a list of topics related to (my) cues and cue construction. Click the button next to each topic
to read my thoughts and learn how I construct the various components of my cues. Forgive me, some of the topics
are little more than rambling thoughts, but perhaps they may give you an idea if I am the right person to build
you your next custom cue. If you would rather read them all at once, use the button here
 to expand/collapse all of the topics with one click.
What does MVP Stand For?
After I started building cues I gave it considerable thought what I wanted to call them. There is already
a "Kelly Cues" line of cues so that was out of the question. Peterson cues is simple enough, but I wanted
to avoid any confusion with Craig Petersen. At some point, I decided perhaps a catchy name
that still had personal meaning might be the way to go. After thinking of how my family could possibly play
a role in naming my cues, I instantly knew I had it. My two daughters' names are Meredith and
Victoria. Obviously, the P stands for Peterson. Voila! The initials MVP have personal
meaning to me, are instantly recognizable, and could be deemed a logical name for a pool cue. Will
playing with a cue I build you make you the most valuable player of your next league session? Well, probably
not (at least not if you aren't already headed in that direction), but we won't know until we try!
Cue Dimensions
The tip diameter for "off the shelf" cues is usually 12.75 mm as that is my personal preference. Otherwise, the tip diameter
is up to the customer. Joint diameters are .840" and not adjustable. I use carbide sanding mandrels to maintain a flush fit
between the joint collars of interchangeable shafts/butts. The standard butt diameter is 1.27", with a single linear taper
from joint to butt end. I do sometimes change the diameter of the butt end, depending on the cue and the customer, but not
by a great deal. The standard length for an MVP cue is 58", but longer (or shorter I suppose) cues can be made.
Ferrules
Capped VS Uncapped
A capped ferrule is a stronger ferrule. An uncapped ferrule provides direct contact between the tip and the face of the shaft tenon. Some
think an uncapped ferrule may provide an advantage in the feedback department because of that direct contact. But, a ferrule that
cracked because it was uncapped is not likely to perform well.
Threaded VS Unthreaded
Some cuemakers thread ferrules, some don't. Threading adds a mechanical bond to the glue bond. An unthreaded (often called sleeved)
ferrule typically has some shallow glue grooves to help the glue bond hold up. Both styles work well when installed correctly, and they both
can fail when installed poorly.
Small VS Large Tenon
A large 3/8" tenon is obviously stronger than a 5/16" tenon. The trade off, of course, is a thinner walled ferrule is
weaker than a thicker one. Normally, a 5/16" tenon is quite strong enough for a pool cue. Tenons twisting or breaking off are a
result of internal stresses due to a faulty ferrule install, so maybe a 5/16" tenon to help prevent ferrules from cracking is wise. But,
when a ferrule is uncapped, a 3/8" tenon provides more tip to shaft surface contact.
My Preference
I prefer an uncapped and threaded ferrule, and large diameter tenon because of the advantages already mentioned. My favorite ferrule materials
are deer antler, one of the variants of a linen based melamine, or one of the newer forms of Micarta. All of these materials are
strong enough to be used with my preferred design. For break and jump cue ferrules, I normally use Ivorine IV. That brutish
ferrule material is as strong as they come. Other ferrule materials I use not as strong as the ones mentioned above
are likely to be capped and/or installed on a 5/16" threaded tenon.
Shafts
Coming soon...
Joint Pin
My standard joint screw is the 3/8"-10 flat bottom pin with a .308" minor diameter. I use this pin for 3 reasons. First, I like this pin
because it is designed to accurately locate the shaft to the minor diameter. This helps one to maintain concentricity. Second, because
the shaft is bored to .309, there is a lot of intimate contact between the pin and the shaft. While it is impossible to scientifically prove
this makes a difference in the feel of the hit, I sure like the idea. The picture below, used with permission from Bob Dzuricky, illustrates what
I am talking about.

Pictured on the left is the fit of a standard 3/8"-10 pin. Note the considerable air space between the minor diameter of the pin and the maple.
In contrast, the fit of the flat bottom pin on the right shows no air space. The tolerances are that close, are repeatable, and you can feel this
as you screw the shaft onto the butt of the cue.
The third reason I like this pin is I can cut the threads using live tooling. The Uni-loc Radial pin achieves the same level of concentricity and
fit that the flat bottom pin provides, but it requires use of a tap. There is nothing wrong with tapping for the radial pin, I simply prefer
to use live tooling for thread cutting whenever possible. If I were not using the 3/8"-10 flat bottom pin as my standard joint screw, I would
probably
be using the Radial pin.
Do I Core My Cues?
I view coring as a sound technique to be used in cue construction when there is a need. I don't core every cue or component, but I do core often.
My primary reason for coring is to target a specific weight and balance of the cue. Consequently, the species (I do prefer tone woods) of the
coring dowel I use varies. In addition to controlling the weight and balance, some woods should be cored to add strength to the component.
Burl wood is one example of this.
Wood Selection
I started collecting wood before I ever purchased a lathe. I now have a variety of species that have been seasoning in my shop for years
that are available for immediate use. I have a small supply of the coveted Brazilian rosewood (true Dalbergia nigra), as well as many other
species of rosewood from around the world. I have a large selection of nicely figured cocobolo to choose from, some great birdseye bocote,
and even figured purpleheart. I also have a supply of less commonly used woods like Texas ebony and African olivewood, and Asian satinwood.
My
Future Cues page includes pictures of many
of these species of woods that customers can reserve for their next custom cue.
Pointed Forearms
I am currently not building cues with pointed forearms. Building pointed forearms, particularly ones with veneered points, is a discipline I will
gain proficiency in before I ever sell one I build. In the meantime, I have decided to not use pre-made forearm blanks. Some cue makers do, and
that is fine with me. This is one of the hotly debated cue making topics that I will avoid as each cue maker must make up his own mind. For me
and my cues, not using pre-made forearm blanks is the right decision.
What About Full Splice Cues?
I do make cues from full splice blanks. I have a supply of purpleheart Dufferin high runs for economical conversions. These are actually nice
oversize blanks (some even with light figure) that were made just prior to Dufferin moving their operation overseas. The next step up are
still fairly economical full splice blanks manufactured specifically for cue makers available from several vendors. Then comes full splice blanks
with veneers from various sources. Some of these options are listed on my
Prices page, and some are pictured on my
Future Cues page.
Weight Bolts
I usually do not add a weight bolt to the rear of a cue I make. My cue modeling computer
program allows me to control the weight and balance
of the cue through selection of the woods used in the cue, coring, varying the joint pin and joint collar, and varying the A-joint
connecting pin. If an adjustment is desired, a weight bolt can always be added to a finished cue.
Logo/Signature On My Cues
There has been much debate on how custom cues should be branded. Many feel a signature gets in the way of the aesthetics of the wood, but a small
logo on the butt sleeve is appropriate. Others think logos look cheap, but a signature is the last personal touch the cue maker adds to the cue.
I offer both options. Ultimately, for custom order cues, it is up to the customer whether he wants a logo to appear on his cue, a signature, or both.
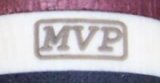
The logo I am currently using on the butt cap is pictured on the left. I prefer logos to identify the cue without being distracting. Given this,
my "logo" is nothing more than encased
MVP initials. Pictured to the left is how the laser engraving (unfilled) looks in ivory.
The engraving can be filled with a contrasting color to the butt cap material, or it can be left unfilled for a subtle look. Additionally, joint protectors
with this logo engraved on the face are available.
Pictured to the right is my standard signature; my first name and the year the cue was finished. I will typically do this somewhere
in the forearm of the cue, but that can vary depending on the specific construction or woods used.